
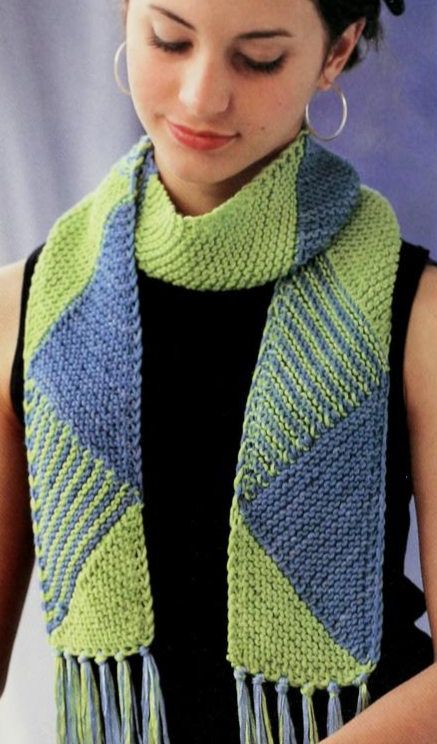
This attractive scarf works as well with bright colors as with black and gray yarns. Made with simple triangles, the addition of color changes and stripes keeps the knitting interesting. The unusual construction involves working two colors without ever having to cut either yarn from beginning to end.
MATERIALS
Approx total: 300 yd/274.3m worsted-weight yarn that knits up at 20 sts to 4″/ 10cm
Color A: 150 yd/137.2m in green
Color B: 150 yd/ 137.2m in blue
Approx total: 50yd/45.7m silk ribbon yarn for fringe
Color C: 25 yd / 22.9m in green
Color D: 25 vd / 29m in blue
Crochet hook: 3.5min (size E U.S.)
Stitch marker
FINISHED MEASUREMENTS
Approx 54”/137.2cm x 41/4” /10.8cm without fringe
GAUGE
16 sts and 34 rows = -1″/10cm in Garter Stitch
Aluiays take time to check your gauge.
PATTERN STITCHES
Diagonal triangles see here , and make a small practice swatch if you have never used this technique before.
Instruction
Loosely cast on 16 sts.
Note: You can easily make this scarf any size. To make the scarf wider, cast on more stitches; to make it narrower, cast on fewer sts. When the first triangle is complete, the number of stitches on the needle should be twice the number of cast-on stitches. less 1 stitch.
Step 1
Make Right Triangle (in A).
Row 1: With A. k 1 inc 1, k 1, turn; s1, k to end, turn.
Row 2: K 1 inc 1. k 3, turn; pm. s 1 . k to end, turn.
Row 3: K 1 inc 1 k to marker, rm, k 1 turn; pm. sl. k to end, turn.
Repeat row 3 until all cast-on sts have been used and there are 31 sts in total. Color A will be positioned at the top of the triangle. Slide all sts to other side of needle and attach B. Do not cut A.
Step 2
Make first Equilateral Triangle (in B).
Row 1 : With B. k 1 inc 1. skp, turn; sl. k to end, turn.
Row 2: K line 1. k 1, sip, turn: s 1 . pm. k to end. turn.
Row 3: K 1 inc 1 k to marker. rm. skp, turn; sl. pm. k to end, turn.
Repeat row 3, until you have used up all but one of the previous triangle \ sts. End with: k lint: 1. k to marker. rm. skp-31 sts. B is positioned at the lower point of the 2nd triangle.
Step 3
Make second Equilateral Triangle (in A and B Stripes).
Row 1: With A. k line 1 skp, turn; s1, k to end, drop A. turn.
Row 2: With B. k 1 inc 1 k 1, skp. turn; s1, pm. k to end, drop B. turn.
Row 3: With A, klincl. k to marker. rm, skp. turn; s 1 • pm. k to end, turn.
Repeat row 3. alternating A and B. making sure that A is at the lower point of the triangle in position to turn and knit the fourth triangle, and B is at the upper point of the triangle when von have used up all the 2nd Triangle sts-31 sts.
Step 4
Make third Equilateral Triangle (in A).
Repeat instructions for Step 2, substituting A for B. Turn.
Repeat Steps 2 to 4 until 11 triangles are complete, or until scarf is desired length.
Step 5
Make End Triangle (in A).
Note: If you changed the length of the scarf, use the appropriate color for this triangle.
Row 1: K 1 inc 1, skp, turn; s1, k to end, turn.
Row 2: K1 inc 1, kl, pm, skp, turn; s1, pm, k to end, turn.
Row 3: K1 inc 1, k to marker, rm, skp, turn; s1, pm, k to end, turn.
Repeat row 3 until all but 15 sts of the previous triangle’s sts have been used up (half less one stitch), and then continue as follows:
Row 1: Skp, k to marker, rm, skp, turn; sl, pm, k to last 1 st, turn-1 st left unknitted on the right needle.
Row 2: S1, pass 2nd st on right needle over 1st, k to marker, rm, skp, turn; sl, pm, k to last 1 st, turn.
Repeat row 2 until a total of 3 sts remain.
Bind off rem sts.
FINISHING
Cut yarn. Weave in ends.
Attach Fringe
Cut thirty-six 15″/38.1cm lengths of silk ribbon, color C, and thirty-six 15″/38.1 cm lengths of silk ribbon, color D.
Each fringe requires 3 lengths of color C and 3 lengths of color D. Using crochet hook, pull 6 strand loop through bottom stitch on scarf edge, and knot the fringe by passing the strands through the loop. Make 6 evenly spaced fringes on each end of scarf. Trim fringes to even them out.