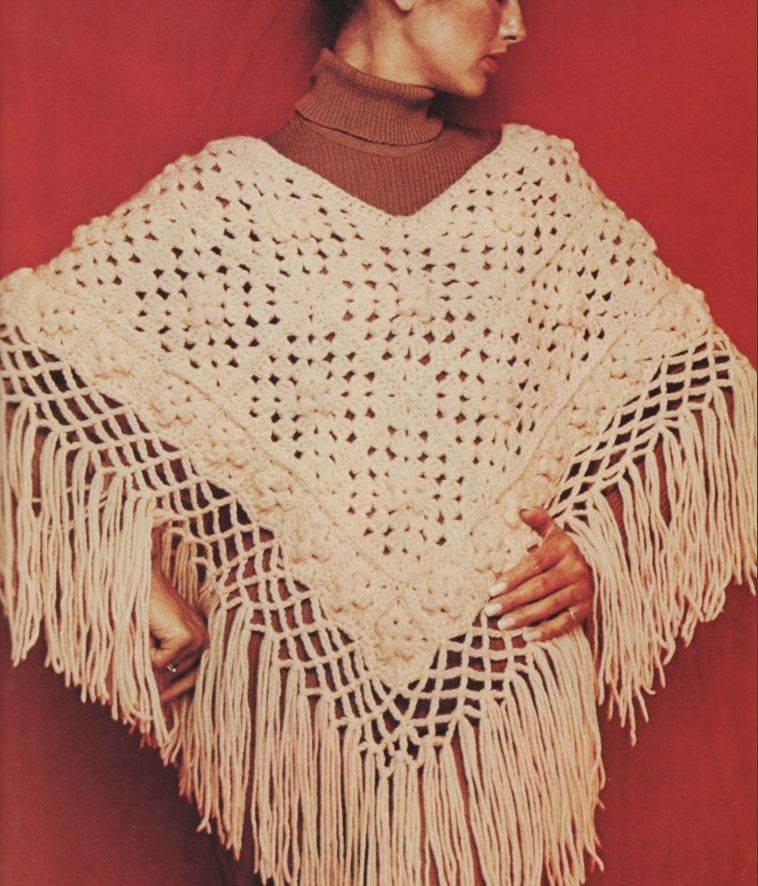
MATERIALS: 16 ounces knitting worsted. Aluminum crochet hook size G. or size required to crochet to gauge.
GAUGE: Large square =- 41/2 “.
LARGE SQUARES: Make 20. Start at center. ch 4. Join with sl st to form ring.
Rnd 1 (right side): Ch 3: work 3 dc in ring, drop Ip from hook, insert hook in top of ch-3 and in dropped Ip, y o hook and pull through all Ips on hook (first cl made), ch 3: • work 4 dc in ring, drop Ip from hook, insert hook in first dc of group and in dropped Ip, y o hook and pull through (another cl made). ch 3. Repeat from • twice more; sl st in top of first cl.
Rnd 2: SI st in next ch-3 sp; ch 3. in same sp work 2 dc, ch I and 3 dc (first corner made). ch I; • in next ch-3 sp work 3 dc. ch I and 3 dc (another corner made), ch 1. Repeat from twice more; join to top of ch-3.
Rad 3: SI st in each of next 2 dc and in next ch. I sp. Work a first corner in same sp. ” ch I, 3 dc in next sp (shell made), ch I, work corner in next corner sp. Repeat from twice more; ch 1, shell in next sp. eh 1; join.
Rnd 4: SI st in each of next 2 dc and in ch-1 sp, work a first corner in same sp, (ch 1. shell in next sp) twice; ch I. work corner in next corner sp. Repeat from twice more; (ch I, shell in next sp) twice; ch 1, join.
SMALL SQUARES: Make 30. Work as for large square. working first. 2nd and 5th mds only. Break off.
ASSEMBLE: Hold 2 large squares together with wrong sides facing and join along one edge by working sl st through back Ips only. Join 5 squares in a strip, then make another strip in same manner. Join strips to form rectangle (see diagram). Make another rectangle. Add 25 small squares for border as shown. Join end A of first rectangle to B section of 2nd rectangle. Then join end A of 2nd rectangle to section B of first rectangle to form poncho.
Fringed Edging:
Rod 1: Starting at one corner (X on diagram).* work 7 sc along edge of next small square. sc in joining scam. Repeat from • to next corner, ending last repeat with sc in corner. Continue along second edge in same manner.
Rod 2: • Ch 6. skip 3 sc. sc in next sc. Repeat from • around.
Rnd 3: SI st to center of next 1p. • ch 6. sc in next Ip. Repeat from • around.
Rod 4: Repeat Rnd 3. Place a marker on sc on 4th row directly above X on chart.
Rnd 5: SI st to center of next Ip. • ch 6, Sc in next Ip. Repeat from • to first marker; ch 6, sc in marked se, ch Es sc in next Ip (I Ip inc at corner). Complete md, increasing Ip at other corner in same manner.
Rnd 6: Repeat Rnd 3. Break off.
Fringe: Work 1 tassel in each sc and in center of each Ip on 6th md as follows: Cut 2 strands of yarn 18″ long. Hold 2 strands tog and fold in half. With right side facing you. draw folded end through Ip (or sc), then draw ends through folded end and tighten.