Use only PATONS 8 PLY TOTEM for this garment. Another yarn may give unsatisfactory results.
| LADY | MAN | ||||||
| Size | 10 | 12 | 14 | 16 | 18 | 20 | |
| Length | cm | 60 | 60 | 61 | 66 | 67 | 67 |
| ins | 231/2 | 231/2 | 24 | 26 | 261/4 | 261/4 | |
| Sleeve seam …….. | cm | 43 | 43 | 43 | 48 | 48 | 48 |
| ins | 17 | 17 | 17 | 19 | 19 | 19 | |
| Garment measures | cm | 85 | 90 | 95 | 100 | 105 | 110 |
| ins | 331/2 | 351/2 | 371/2 | 391/2 | 411/2 | 431/2 |
This is an easy-fitting garment.
PATONS 8 PLY TOTEM 50g balls
| Main Colour (M) | 9 | 9 | 10 | 11 | 12 | 12 |
| 1st Contrast (C1) | 2 | 2 | 2 | 2 | 2 | 2 |
| 2nd Contrast (C2) | 1 | 1 | 1 | 1 | 1 | 1 |
Quantities are approximate as they vary between knitters.
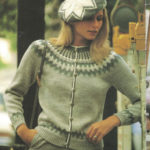
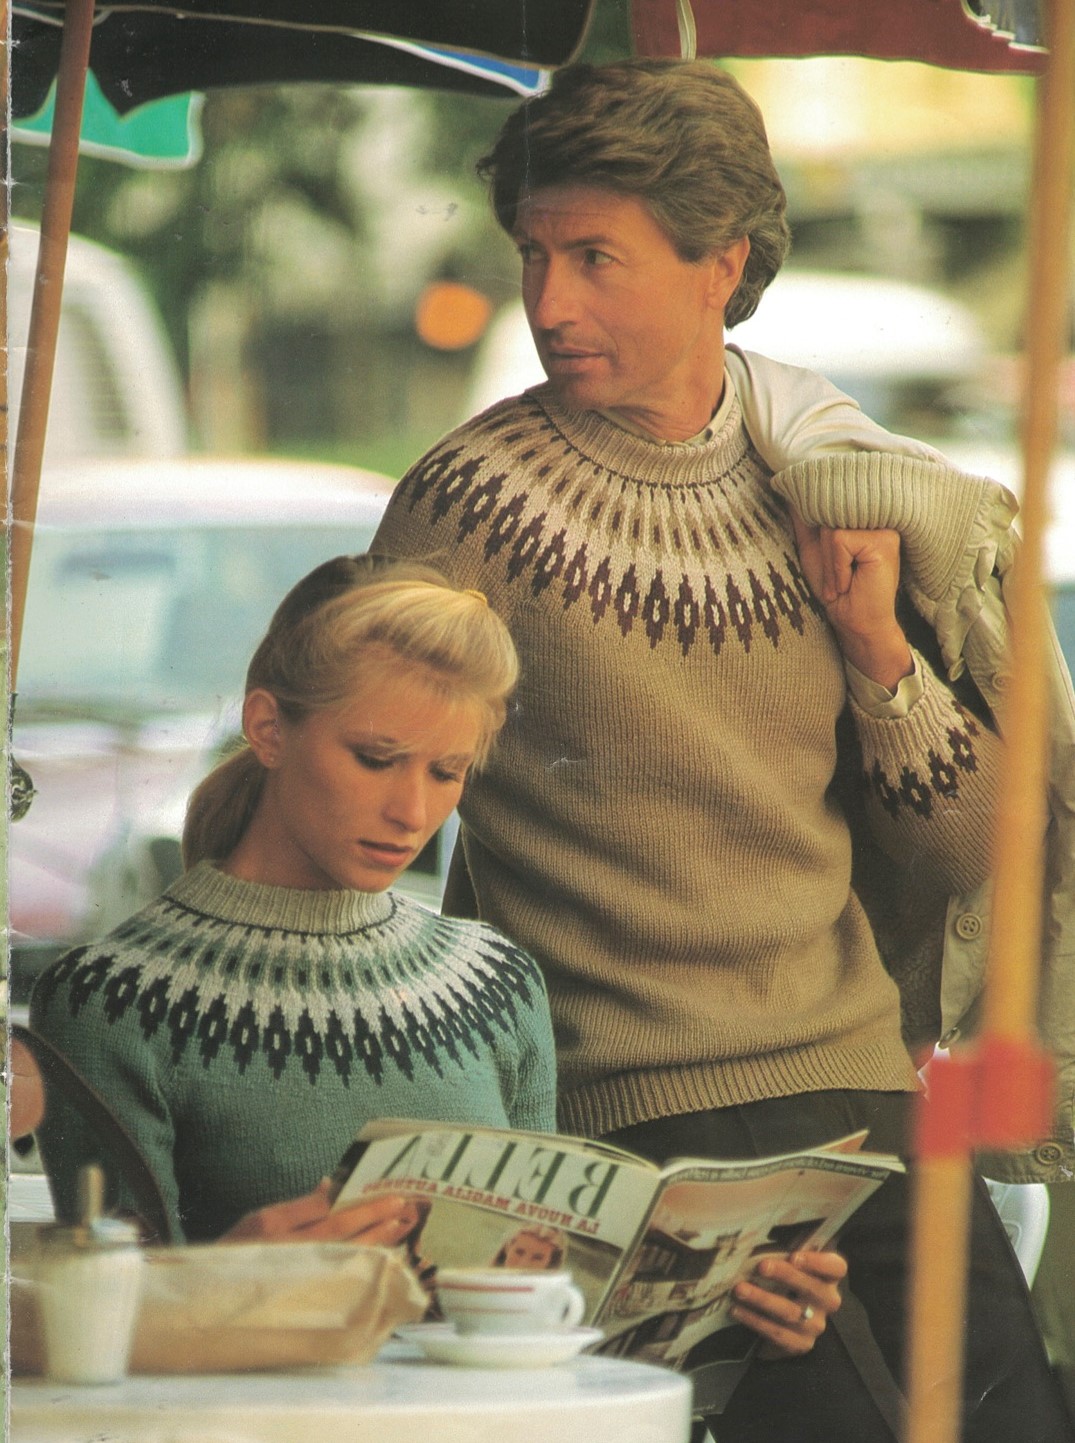
The colours used in our photo garments were:—
Main Colour — Lady 1153, Man 1006
1st Contrast — Lady 8675, Man 8579
2nd Contrast — Lady 9003, Man 220
NEEDLES— Milward or Patons Beehive.
1 pair each 4.00 (No 8), 4.50 (No 7) and 3.25 (No 10), 1 set 3.25 (No 10); 4.50 (No 7) Milward Circular Knitting Needle (60cm … 24 ins … long), or sizes needed to give correct tension.
ACCESSORIES — 4 Stitch Holders; Milward Knitters Needle to sew seams.
ABBREVIATIONS: Check This Link
TENSION — 221/2 sts to 10 cm (approx 4 Ins) in width over stocking st using 4.00 (No 8) Needles.
Why you should knit a tension square.
Loose Tension will cause the garment to stretch, drop and rub. Tight Tension will make the garment too small, with a hard fabric that will matt during washing.
With Correct Tension, your garment will look like our photo. Using 4.00 (No 8) Needles, cast on 33 sts.
Work 46 rows stocking st.
Cast off loosely.
Lay your square on a flat surface, place a metric rule across the centre of the square and mark 10 cm with pins. Count the number of sts between the pins. You should have 221/2 sts.
Less sts means loose tension — try needles a size smaller. More sts means tight tension — try needles a size larger. When you have achieved the correct tension, use the same needles to knit your garment (you may unravel your tension square and use the yarn in your garment). Remember, if you need to change the needle size to achieve the correct tension, you must also change the size of needles used in bands, etc.
BACK. Using 3.25 (No 10) Needles and M, cast on 97 (103-109-115-121-127) sts.
1st row — K2, P1, Kl, rep from to last st, Kl.
2nd row — K1, P1, K1, rep from’ to end.
Rep 1st and 2nd rows 8 times.
Change to 4.00 (No 8) Needles.
Work in stocking st until work measures 40 (40-40-43-43-43) cm … 153/4 (153/4-153/4-17-17-17) ins … from beg, ending with a purl row.
Page 8—Book 671
Shape raglan armholes — Cast off 3 (3-4-3-4-4) sts at beg of next 2 rows. •
Dec at each end of next and alt rows until 81 (87-87-91-91-97) sts rem.
Work 1 row stocking st.
Shape back (NOTE — When turning, bring yarn to front of work, slip next st on to right-hand needle, y bk; slip s(,back on to left-hand needle, then turn and proceed as instructed — this avoids holes in work) — 1st row — K2 tog, K23, turn.
2nd and alt rows — Purl to end.
3rd row — K2 tog, K15, turn.
5th row — K2 tog, K7, turn.
7th row — K2 tog, knit across all sts to last 2 sts, K2 tog. 8th row — P24, turn.
9th and alt rows — Knit to last 2 sts, K2 tog.
10th row — P16, turn.
12th row — P8, turn.
14th row — Purl across all sts.
Leave rem 73 (79-79-83-83-89) sts on a stitch-holder.
FRONT. Work as for Back to
Dec at each end of next and alt rows until 87 (93-93-105105-111) sts rem.
Work 1 row stocking st.
Shape front — 1st row — K2 tog, K29 (29-29-39-39-39), turn. 2nd and alt rows — Purl to end.
3rd row — K2 tog, K24 (24-24-35-35-35), turn.
5th row — K2 tog, K19 (19-19-31-31-31), turn.
Cont in this manner, working 5 (5-5-4-4-4) sts less in every alt row until the row “K2 tog, K4 (4-4-‘3-3-3), turn” has been worked.
Next row — Purl to end.
Next row — K2 tog, knit across all sts to last 2 sts, K2 tog. Proceed as Poll — 1st row — P30 (30-30-40-40-40), turn. 2nd and sit rows — Knit to last 2 sts, K2 tog.
3rd row — P25 (25-25-36-36-36), turn.
5th row — P20 (20-20-32-32-32), turn.
Cont in this manner, working 5 (5-5-4-4-4) sts less in every alt row until the row “P5 (5-5-4-4-4), turn” has been worked.
Next row — As 2nd row.
Next row — Purl across all sts.
Leave rem 73 (79-79-83-83-89) sts on a stitch-holder.
SLEEVES. Using 3.25 (No 10) Needles and C1, cast on 45 (45-45-53-53-53) sts.
Work 17 rows rib as for Back.
18th row — Rib 4, inc in next st, rib 3 (3 3 5 5-5), rep from to last st, rib 1 … 55 (55-55-61-61-61) sts.
Change to 4.50 (No 7) Needles.
NOTE — Do not weave colours in Fair Isle patt, but carry colours not in use loosely across on wrong side. Always carry colours to ends of rows and always carry background colour above pattern colours.
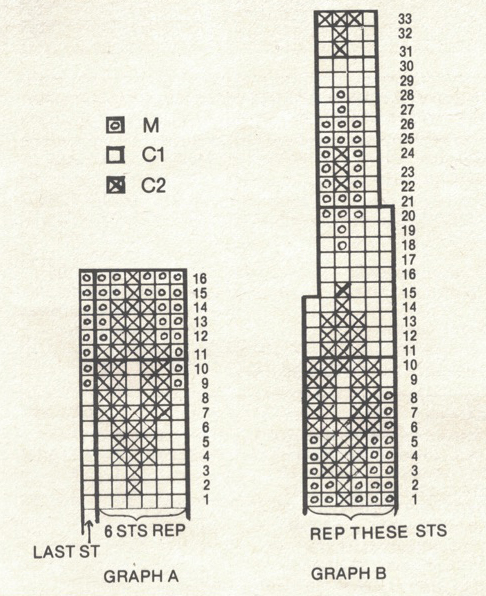
Work rows 1 to 16 incl from Graph A.
Change to 4.00 (No 8) Needles and M.
1st row — K2, “Ml”, knit to last 2 sts, “Ml”, K2.
Cont in stocking st, inc (as before) in Poll 8th (6th-4th-6th4th-4th) rows until there are 73 (71-63-87-71-77) sts, then in Poll 10th (8th-6th-8th-6th-6th) row/s until there are 75 (7983-91-95-97) sts.
Cont until side edge measures 43 (43-43-48-48-48) cm … 17 (17-17-19-19-19) ins … (or length desired) from beg, ending with a purl row.
Shape raglan —Cast off 3 (3-4-3-4-4) sts at beg of next 2 rows. Dec at each end of next 1 (3-1-1-1-1) row/s.
Work 3 (1-1-3-3-3) row/s stocking st.
Site 18 only — Rep last 4 rows once.
All Sizes … 67 (67-73-83-83-87) sts.
Dec at each end of next and alt rows until 53 (53-53-61-61-61) sts rem.
Work 1 row stocking st.
Leave rem sts on a stitch-holder.
YOKE. Using back-stitch, join raglan seams. With right side facing and beg at left back raglan seam, slip all sts from stitch-holders on to 4.50 (No 7) Circular Needle … 252 (264-264-288-288-300) sts.
Work rounds 1 to 14 incl from Graph B (read all rounds from right to left).
15th round — • K3C1, K1 C2, sll, K1 C1, psso, rep from • to end
… 210 (220-220-240-240-250) sts.
Work rounds 16 to 20 incl from Graph B.
21st round — • K2 tog C1, K3M, rep from • to end … 168 (176-176-192-192-200) sts.
Work rounds 22 to 33 incl from Graph B.
Change to set of 3.25 (No 10) Needles and CI for Neckband. 1st round — K2 tog, rep from to end … 84 (88-8896-96-100) Ms.
2nd round — • K1, P1, rep from • to end.
Rep 2nd round 27 times. Cast off loosely in rib.
MAKE UP. With a slightly damp cloth and warm iron, press lightly. Using running stitch (see below), join side and sleeve seams. Fold neckband in half on to wrong side and slip-stitch in position. Press seams
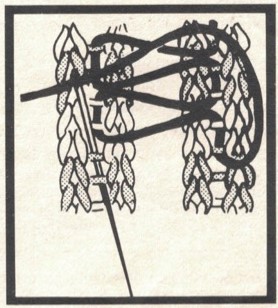
RUNNING STITCH SEAM. This is an easier and quicker method than back stitch, yet gives the same neat appearance on the right side of the garment. It is worked from the right side, making the matching of stripes, Fair Isle and fancy patterns quite simple. The stitches should be taken one knitted stitch in from the edge, so care must be taken to “unroll” edges of work as you go along. Use a Milward Knitters Needle — this has a blunt end to avoid splitting the yarn.
Place the 2 pieces of knitting side by side, with right side uppermost. Leaving an end about 15 cm long (to be finished off later), insert the needle from wrong side to right side between the first and second rows on the left-hand piece of knitting (this is the only stitch which is taken from the wrong side). Move to the right-hand piece of knitting, insert needle between cast-on and first row and bring it out between second and third rows (thus picking up 2 cross bars). Return to left-hand piece, insert needle in same space as that in which yarn came out from previous stitch (between first and second rows) and pick up 2 cross bars. Continue working from side to side in this manner. Leave stitches about 1 cm wide until you have completed about 2 cm of stitching, then pull thread up fairly firmly to close seam. Yarn should be tight enough so that it does not show, but loose enough to allow the garment elasticity. Take care not to pull through the end left at the cast-on edge.
Check that pieces are even at the top of the rib and at any horizontal lines in the pattern (diagram has been shaded as in 2 row stripes to show the correct placement of stitches so that stripes will match perfectly). Finish the top of your seam with 1 or 2 straight stitches over the cast-off edge and run the end along the edge of the fabric down the seam for about 3 cm. Thread the end left at the cast-on edge into your needle and finish this off in the same way (take care that you take the stitches over the cast-on edge and not over the seam, and the lower edge of your garment will be perfectly straight, with no unsightly dip at the seam).
If you have trouble matching your work at the top of the rib, you may find the following suggestion helpful:— Use a thread long enough to join the entire seam. Leaving most of this thread free to join the main part of your seam, begin at the top of the rib and• work towards the cast-on edge as follows — pick up the cross bars of the two lop rib rows on the left-hand piece of knitting, move to the right-hand piece of knitting, leave the top row of rib free, then pick up the cross bars of the next 2 rows. Continue in this manner with the shorter end of your thread until you reach the cast-on edge and finish off as described before. Then thread the long end of thread into your needle and complete the seam in the normal way.
If this seam needs to be unpicked at any time, simply cut the thread at top and bottom and pull the thread out.